How to Edit a Table of Contents in Word
In this article, you'll learn how to make a Table of Contents in Word, as well as how to update and manage it inside your document.
There are 3 types of Table of Contents you can create in Microsoft Word (all with a number of different options and features):
- Automatic Table (based on your saved formatting)
- Custom Table of Contents that is 100% customizable
- Manual Table that requires you to do all of the heavy lifting
Below are examples of 3 of the many styles of Table of Contents you can quickly create in Word.

The most important thing to know about creating an automatic Table of Contents in Word is that you first need to format your document using theHeading Styles.
That's because it's theHeading Styles formatting (as you can see pictured below) that feeds your Table of Contents. This step is explained in detail below.

If you don't want to use the Heading Styles, you can use aManual Table to create your Table of Contents, as discussed here.
Note: Throughout this article, the wordsTable of Contents andTOC are used interchangeably. On the top, of all examples below were created using the Microsoft Office 365 subscription, which you can learn about on Microsoft's website here.
[Watch] Create a Table of Contents in Word
The first critical step to creating an automatic updating TOC in Word is properly formatting the sections of your document using theHeading 1,Heading 2 and Heading 3Styles.
If you have already formatted your document this way, you can skip to the next section.
Note: You are not limited to the defaultHeading Styles formatting. Below I'll show you how you can not only change yourStylesformatting, but also how you can create your own.
1. Applying Heading Style formatting
To properly format your Word document using theHeading Styles, simply:
- Select the section Headings of your document
- Navigate to theHome tab
- Select theHeading 1,Heading 2 orHeading 3 style, as appropriate
By default, only the Heading 1 through Heading 3 Styles will automatically populate into your Table of Contents.
You can still use the Heading 4 through Heading 9 styles in a Table of Contents, but you'll have to do so with a Custom Table of Contents, as discussed below.
Note: Instead of using the Styles gallery to mark up your Word document, you can also use theAdd Text drop down directly on theReferencestab, saving you a few clicks.
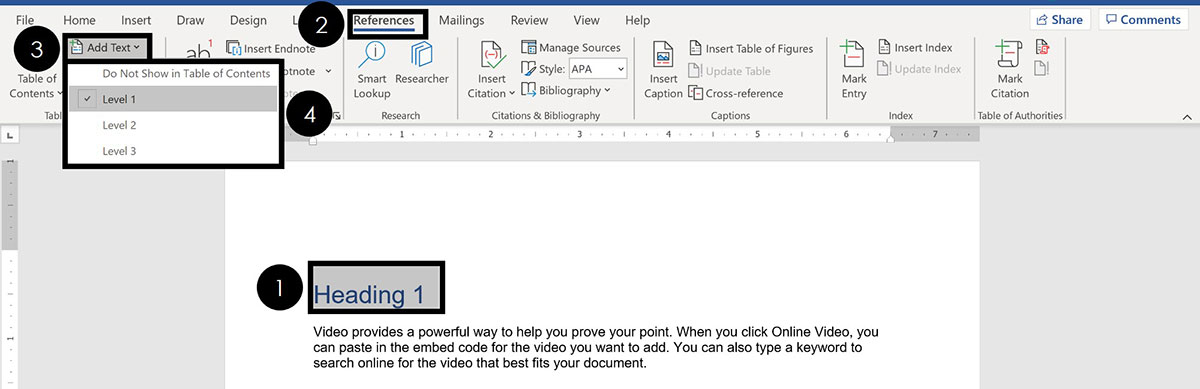 To mark up text using theAdd Textdrop down, simply:
- Selectyour section heading text
- Navigate to theReferencestab
- Open theAdd Text dropdown menu
- Select yourHeadingstyle
This is the exact same thing as using theHeading Style 1,Heading Style 2 andHeading Style 3 options in the Styles gallery on theHometab. The option that saysDo Not Show in Table of Contents is the same as marking your text asNormal.
2. Heading Style shortcuts
If you have a large Word document, you can speed up the formatting process by using Heading Style shortcuts.
Shortcuts like these are the fastest way to double your productivity.

To set up a basic Table of Contents in Word, the 3 Heading Styles shortcuts you'll need to remember are:
- Heading Style 1 shortcut: Alt + Shift + 1
- Heading Style 2 shortcut: Alt + Shift + 2
- Heading Style 3 shortcut: Alt + Shift + 3
You can apply theNormalstyle to any text in your document that you don't want to show in your TOC.

Normal Style shortcut:Ctrl + Shift + N
When making an automatic Table of Contents in Word, only content that is properly formatted using these Heading Styles will appear in your TOC.
Furthermore, this formatting is critical if you later want to convert your Word document into a PowerPoint presentation. To learn how to convert Word to PowerPoint, read our guide here.
3. Changing your Heading Style formatting
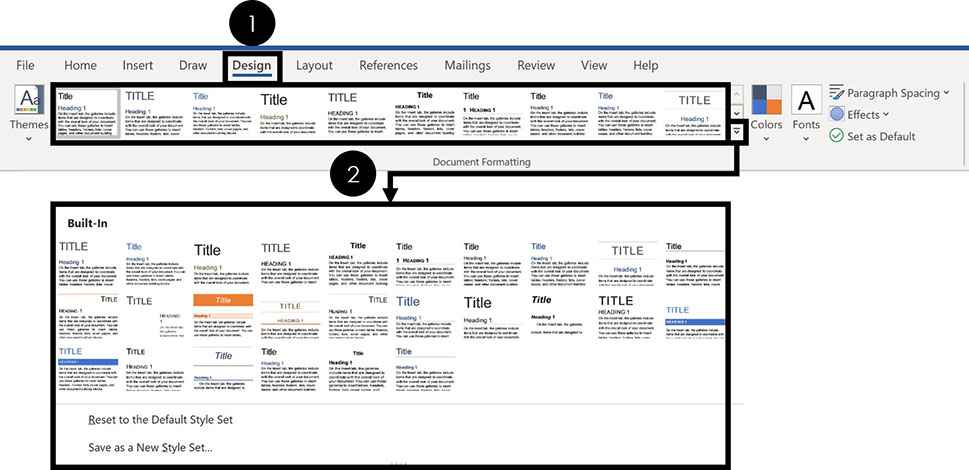
f you don't like the way the default Heading Styles look, you can change them. To do that, simply:
- Navigate to theDesign tab
- Choose a differentDocument Formatting
If you click the downward facing arrow, you will see more options, as pictured above.
Note: TheDocument Formatting styles change all of the formatting styles within your Word document. Therefore, you'll want to review your entire Word document to make sure you are okay with whatever new Document Formatting you select.
4. Creating your own Heading Style formatting
If you don't like theDocument Formatting options for your Heading Styles, you can create your own. To do that, simply:
- Format your Heading Style however you want it to look
- Navigate to theHome tab
- Right-Click the Heading Style you want to change
- SelectUpdate Heading to Match Selection
Doing so will change the Heading Style to match the formatting you'd applied to that text. In addition, it will automatically update all the existing Headings of that level in your Word document.
How to make a Table of Contents
Once you've properly formatted your document using the differentHeading Styles, creating your Table of Contents is pretty straightforward.
1. Insert a Table of Contents
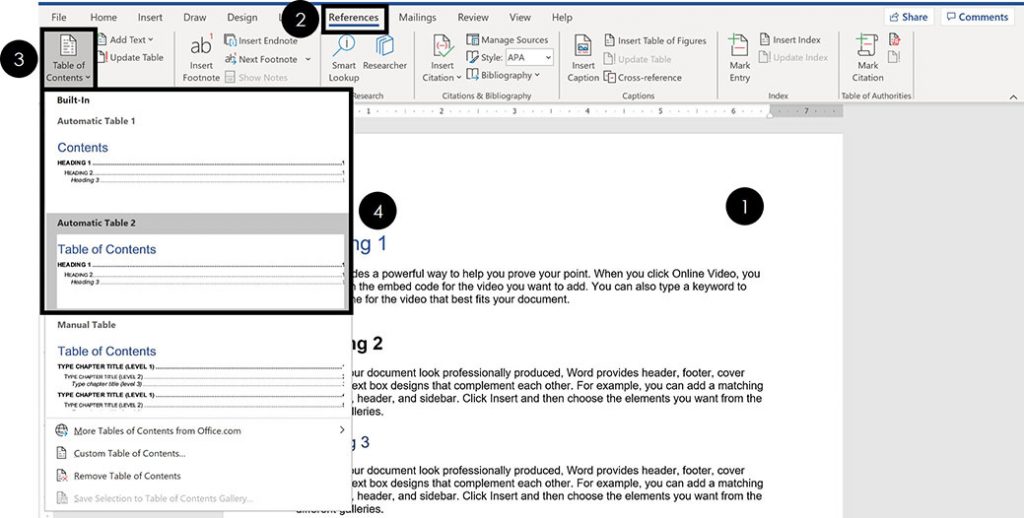
Once your Word document is properly formatted with the Heading Styles, to make your Table of Contents, simply:
- Clickinto your document where you want your TOC
- Navigate to theReferences tab
- Open theTable of Contents dropdown menu
- ChooseAutomatic Table 1 orAutomatic Table 2
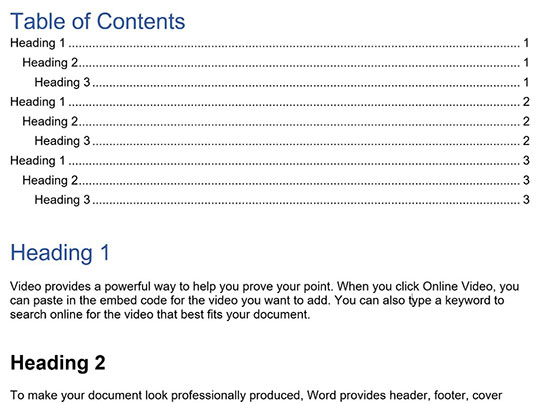
Choosing either option inserts a TOC based on your Heading 1, Heading 2 and Heading 3 Styles.
Your TOC might look different than the one pictured above depending on whether you previously inserted and saved your TOC style.
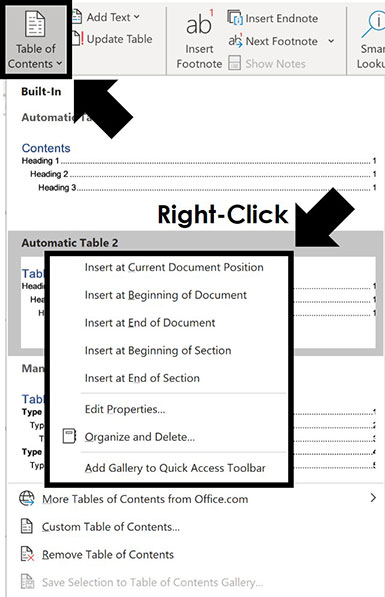
Note: If you right-click the Table of Contents in the dropdown menu, you get options for where to place it in your document..
 Some of these options require you to use the different page break options in Word to properly place within your document.
- Insert at Current Document position
- Insert at Beginning of Document
- Insert at End of Document
- Insert at Beginning of Section
- Insert at End of Section
Setting up these different sections is the trick to getting more than one Table of Contents in your Word document.
That's the difference between the Automatic Table 1 and Automatic Table 2 styles?
Not much. The main difference is the title – table of contents vs. contents – which you can just click into and change. If you need more formatting options beyond the Automatic Table styles, you can create your own Custom Table of Contents as discussed here.
Note:If you do not properly format your Word document using theStylesgallery, inserting a TOC will result in the following warning:No table of contents entries found
 If this happens to you, simply work your way through your document and apply the properHeading 1,Heading 2andHeading 3 styles.
If you want more than just 3 levels in your Table of Contents, you'll need to insert a Custom Table as discussed here.
2. Format your Table of Contents
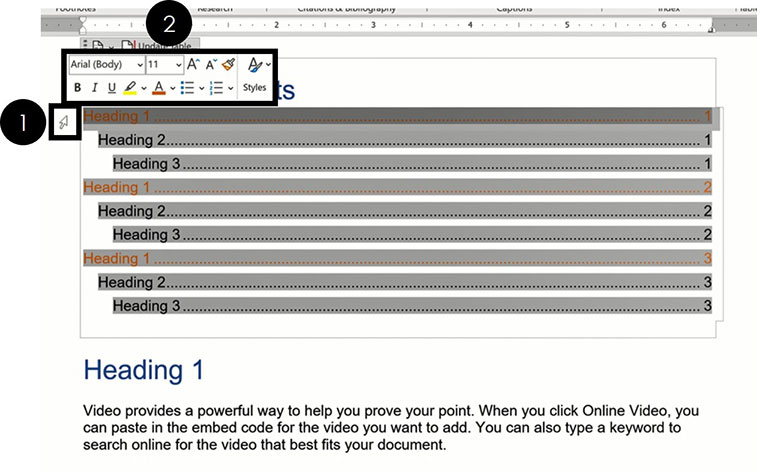
To format your Table of Contents in Word, simply:
- Hover your mouse to the left of your TOC (your arrow will look like a diagonal arrow)
- Select the Heading Style you want to change
- Format it however you wish
Sometimes this takes a few attempts to select your Heading Styles so they all properly update. If it doesn't work the first time, just try it again.
Note: Formatting the Heading Styles of your TOC only affects the formatting styles inside your TOC. None of your document level formatting is affected.
To affect the formatting of the Headings in the rest of your document, you'll need to update the Heading Styles in the Style area of the Home tab.
3. How to save your TOC formatting
After formatting the different levels of your TOC, you are given the option to save that formatting when you exit out of Microsoft Word.
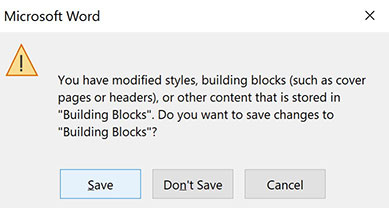
If you selectSave, your manual formatting adjustments are saved to Word. That means that the next time you make a Table of Contents, all of your manual adjustments will show up by default.
Once you reformat the different elements of your new Table of Contents, you will be given the option to save them again when you exit Word.
4. Updating a Table of Contents
Table of Contents in Microsoft Word DO NOT automatically update themselves.
As you add and remove content to your document, you need to manually click theUpdatebutton to have your TOC update itself.
Your TOC is just a snapshot in time of when you either inserted it or last updated it. So, don't forget to update it when you are done making changes to your document.
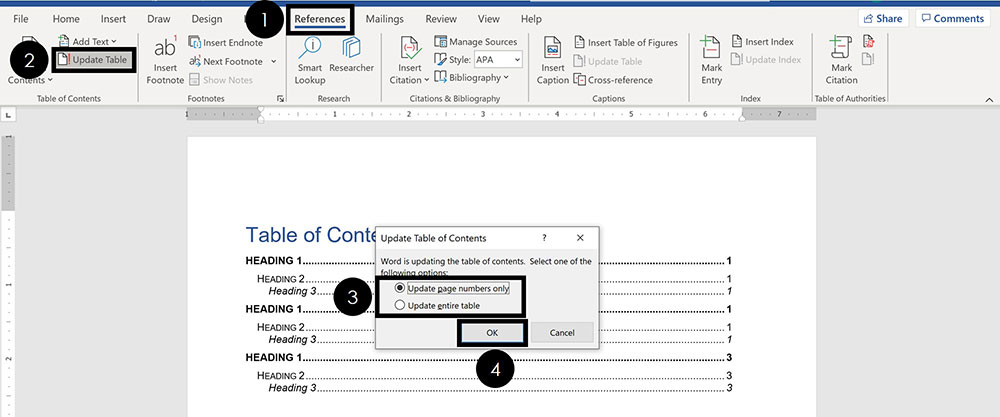
To update a Table of Contents in Word, simply:
- Navigate to theReferences tab
- ClickUpdate Table
- ChooseUpdate p age numbers o nly orUpdate e ntire table
- ClickOK
If you are using one of theAutomatic Tablelayouts, can also select theUpdate Table button at the top of your table, as pictured below.

The two update options are:
- Page numbers only updates the page numbers of your TOC. It does not update the structure of your TOC based on any sections you've added or removed. It also does not update any of the text in your Headings, or the Heading Styles.
- Entire table updates everything in your TOC including page numbers, sections added and sections removed.
If you have made many changes to your Word document, or are unsure of what you've changed, I recommend updating the entire table. That ensures that everything within your document is accurately reflected in your TOC.
5. TOC navigational shortcuts
The cool thing about making an automatic Table of Contents in Word, is that you can use it to quickly jump around your document.
That's because each of the lines of your TOC is a hyperlink to that section within your document. All you need to do is hold down the Ctrl key and click the section of your TOC

An alternative way you can quickly navigate the sections of your Table of Contents is with the Navigation Pane. In it, you can see all the different sections of your document.
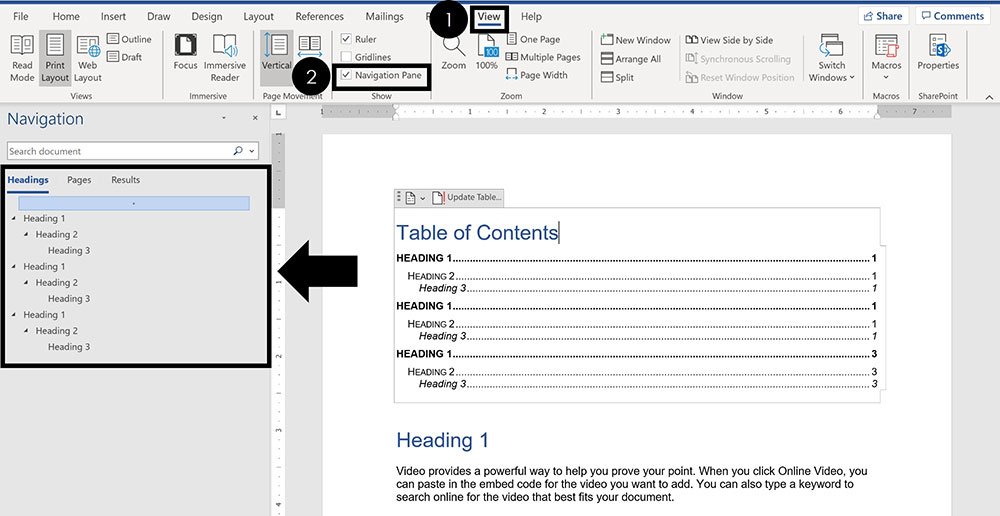
To open theNavigation Pane to see your Headings in Word, simply:
- Navigate to theViewtab
- Click onNavigation Pane
Within theNavigation Pane, you can see, expand, collapse and navigate all the sections within your document.
This is another benefit of using theHeading Styles to properly format your Word document.
Removing a Table of Contents
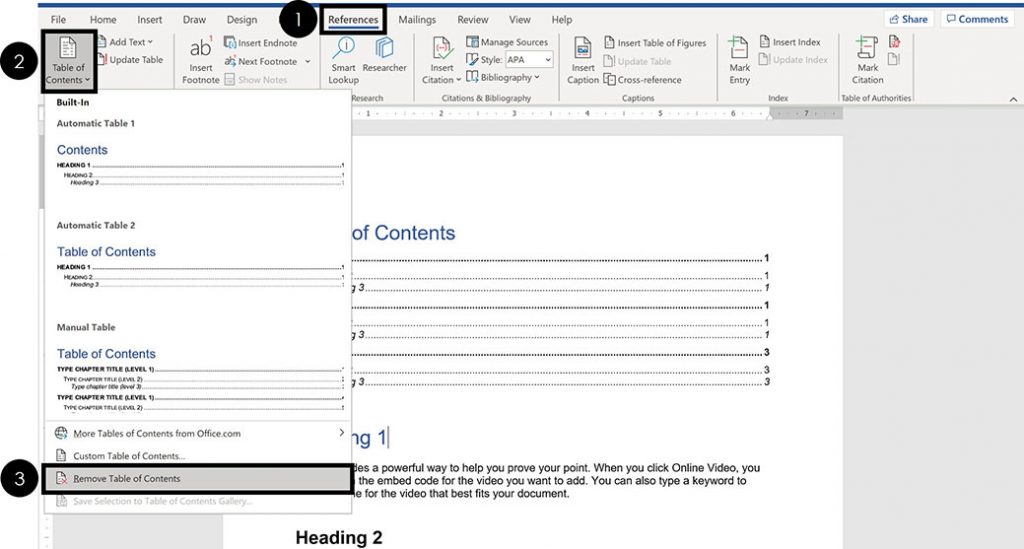
To remove a Table of Contents from a Word document, simply:
- Navigate to theReferences tab
- Open theTable of Contents dropown menu
- SelectRemove Table of Contents
If you are using one of the Automatic Table styles, you can also use the dropdown menu at the top of your table, as pictured below.
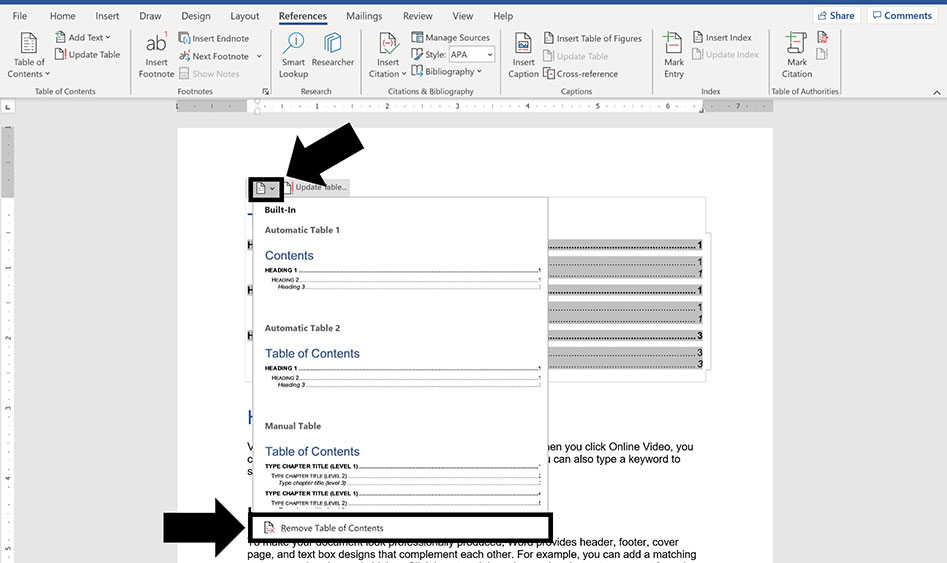
Note: If you are using one of the Automatic Table styles, sometimes the table will not fully remove itself. This is particularly true for TOCs inserted at the beginning or ends of sections.
 If this happens to you, simply click the three dots in the upper left-hand corner to select your TOC. With it selected, either hitCtrl + X to cut the TOC out of your document, or keep hitting theDeletekey (not the backspace key) until it is removed. Sometimes it takes three or four times before the entire TOC container is fully removed.
Creating a Custom Table of Contents
If you need more formatting options than the automatic table styles provide, you can create your own Custom Table of Contents.
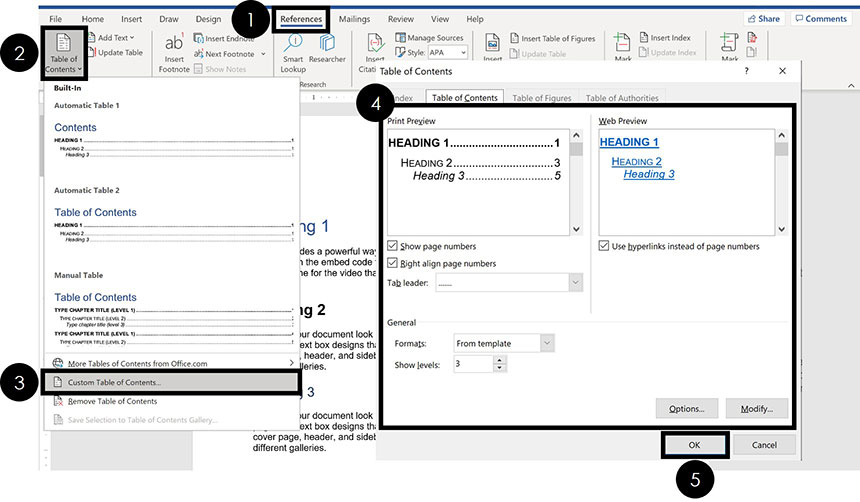
To create a Custom Table of Contents in Word, simply:
- Navigate to theReferences tab
- Open theTable of Content s dropdown menu
- ChooseCustom Table of Contents
- Customize the elements of your TOC (see details below)
- ClickOK
Don't worry about getting your custom TOC right the first time through. There are a lot of options to choose from and you can always go back and make different selections
Note: A Custom Table of Contents is still based on theHeading Styles you use to format your Word document. That means that if you do not properly format your document, your TOC will be blank.
On top of that, as you add and remove content to your document, you will need to use theUpdate Tablecommand to update your custom TOC. If you do not want an automatic updating TOC, insert aManual Table (as discussed here).
1. Show page numbers options
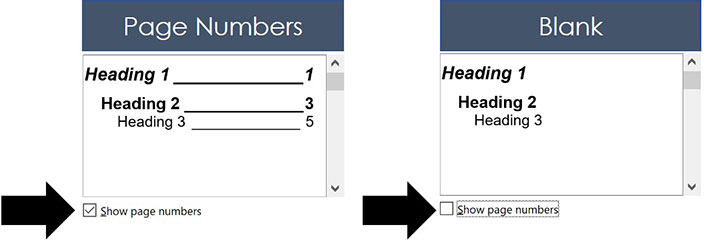
Selecting or de-selecting theShow page numbersbox adds or removes the page numbers from your TOC, as you can see in the picture above.
My recommendation is to always selectShow page numbers, as that makes it easier to understand and navigate your document. That's usually the point of creating a TOC in the first place
2. Right align page numbers options
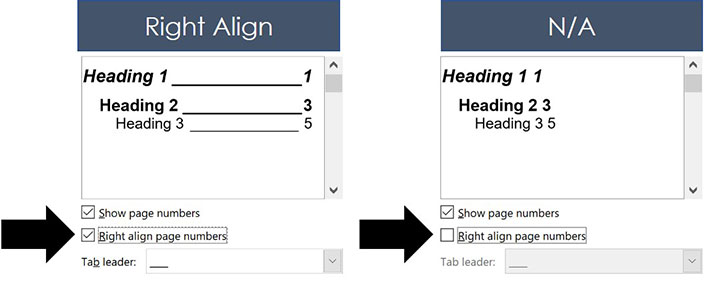
Right align page numbersdetermines whether your page numbers are aligned on the right side of your document, or if they are just stacked up after your section Headings.
My recommendation is to always use theRight align option. This not only makes your TOC easier to read, it also also opens up all of theTab leader options (discussed next).
3. Tab leader options
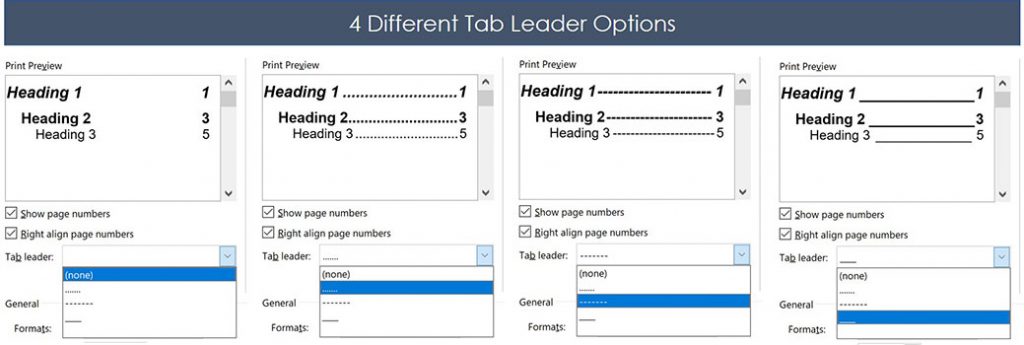
There are four differentTab leader options you can use to format your TOC, as pictured above.
TheTab leader dropdown menu is only available when you are using theRight align page numbers option. If you don't like these styles of Tab leaders, you can use a Manual Table and create your own (as discussed here).
My recommendation is to always use a Tab leader as it makes it easier to find the section page numbers within your Word document.
4. Format template options
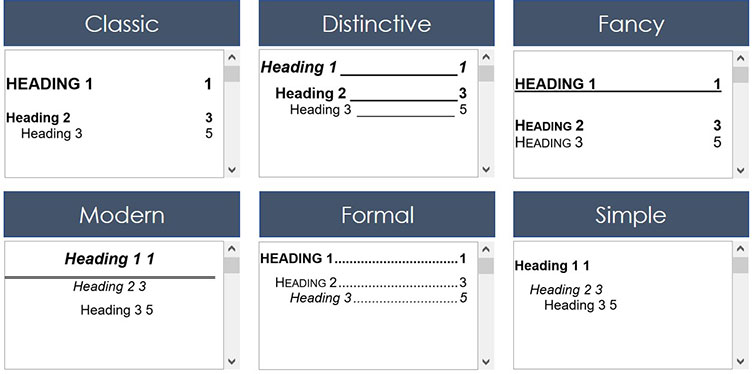
There are a variety of differentFormat templates you can use to change the look and feel of your TOC. For each one, you can make a number of adjustments and customizations. Here are the default formatting options for each one, as pictured above:
- Classic
- Distinctive
- Fancy
- Modern
- Formal
- Simple
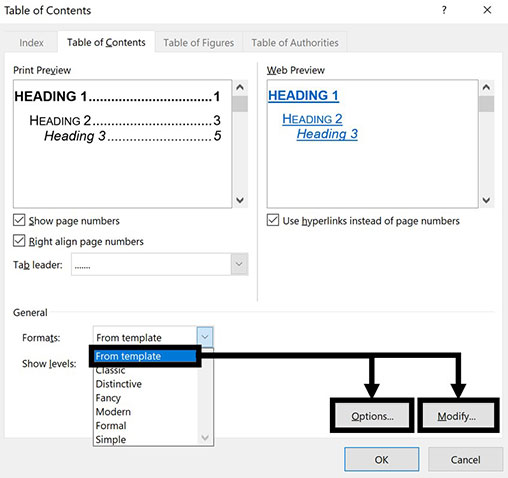
You also have theFrom Template option which opens up the more manual formatting options for you if you know what you are doing (see theOptionsandModifycommands below).
All of these formats can be tweaked using the other formatting options in the Custom TOC dialog box. So feel free to try different combinations to find the custom TOC formatting that works best for you.
5. Show levels options
TheShow levels setting determines how many of the Heading Style levels are included in your Table of Contents.
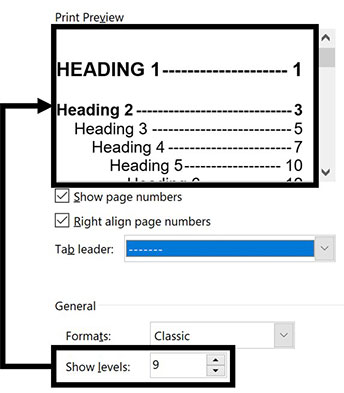
Just remember that to feed more content into your TOC, you first need to use the Heading Styles formatting throughout your document.
This is another example of when properly formatting your Word document can be a real lifesaver.
6. Options & Modify
If you use theFrom Template option to format your TOC, you can apply advanced formatting using theOptionsandModifycommands.
These are for advanced users and go above and beyond the scope of this tutorial (and what you'll probably need to do). So, I'm not going into detail about these options here. But feel free to explore them if you need additional formatting options for your Table of Contents.
Creating a Manual Table of Contents
If you don't want to use the Automatic TOC styles, you can instead use the Manual Table option.
Warning: Just so we are crystal clear before you go this route. Inserting aManual Table means that you will be responsible for manually updating anything and everything within the table.
A Manual Table will not track or update itself based on any content you add or remove to your Word document. Therefore, if you make a lot of changes in your document, updating your TOC could take you a long time. If you ever get tired of updating a table like this, you can insert an Automatic Updating Table as discussed above instead.
To insert aManual Table for your TOC in Word, simply:
- Click into your document where you want your TOC
- Navigate to theReferences tab
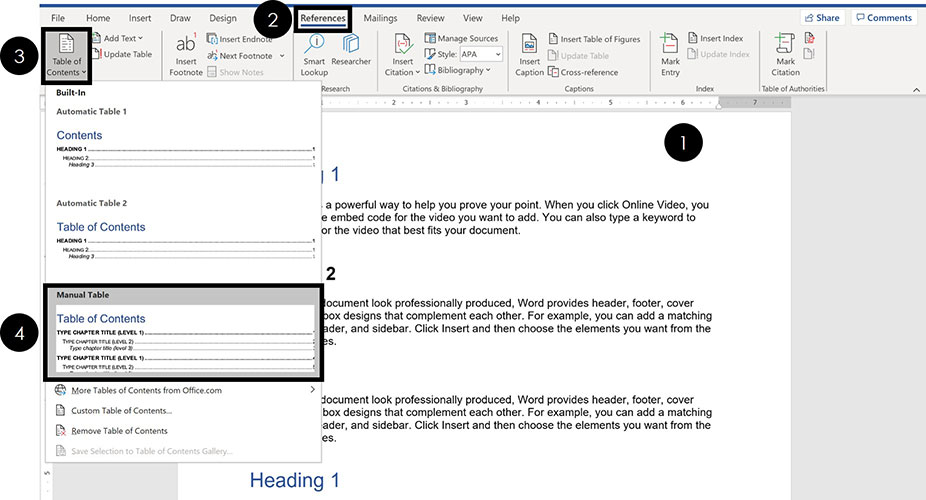
- Open theTable of Contents dropdown menu
- SelectManual Table
SelectingManual Table, you get a default Table of Contents that in no way reflects the content of your document.
Whether you have 1 page or 100 pages in your document, the Manual Table will come pre-loaded with two level 1, level 2 and level 3 placeholders

That means that anything you want done to your TOC, you'll need to do yourself. There is no way to automatically update a Manual Table.
Below you'll find some formatting tips for how to best update and edit yourManual Table.
Alternative: Another way to create your own manual TOC is to insert a two column table and use the left column as your section Headings, and the right column as your page numbers. 
To insert a table in Word to use as your own custom TOC, simply:
- Navigate to theInserttab
- Open theTabledropdown menu
- Select how manyRowsandColumnsyou want in your table
You can then manually add section Headings to your table and remove the outline border if you like. In the below picture, I've left the table border in so you can see that it's a table. 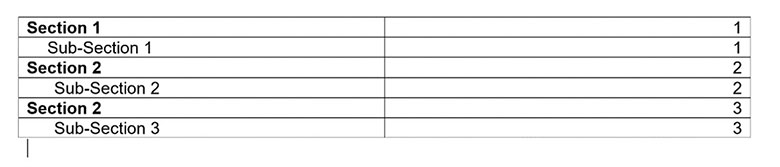 To create a tab space within a table cell as shown in the picture above, simply hit Ctrl + Tab.
1. Add a new section row
To add a new section to aManual table, first add a new blank row. The fastest way to do that is to put your cursor at the end of your page number and hit Enter.
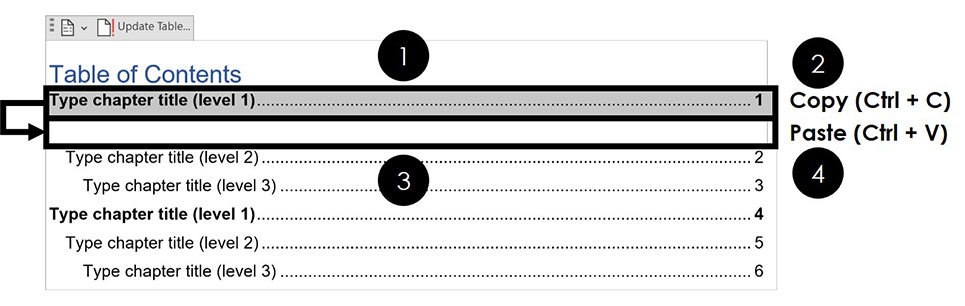
To add a new row of formatting to yourManual Table, simply:
- Selecta section row that you want to copy
- HitCtrl + C to copy the row
- Click into your blank row
- HitCtrl + V to paste your row
Once you've pasted in your new row, you can then type in whatever text you want for it.
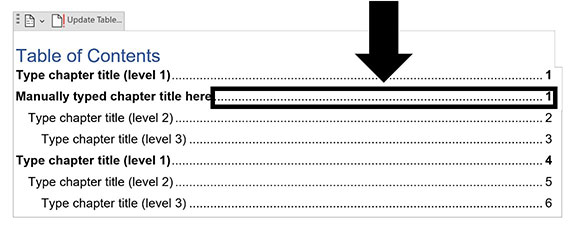
Thankfully, theTab leader dots automatically adjust as you type in your section Headings. You don't have to add them in yourself.
2. Edit your page numbers
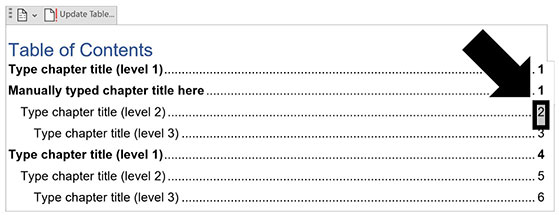
To edit the page numbers of yourManual Table, you'll need to:
- Click and drag to select the page number
- Typeand/orformatyour page number
Remember:When you use aManual Table, you are responsible for manually adding and formatting everything within it (which can be really annoying).
The table will not automatically update in any way, based on the content you add or remove in your Word document.
Conclusion
So that's how to make a Table of Contents in Word, along with all the formatting, navigation and updating options.
The most important thing to remember about your TOC is to use the Heading Styles when formatting your Word document. Doing so will make inserting and editing a TOC super easy and stress-free.
If you enjoyed this tutorial and want to learn more about our training courses and other resources, visit us here.
How to Edit a Table of Contents in Word
Source: https://nutsandboltsspeedtraining.com/table-of-contents-word/